There’s nothing worse than recording a great take—only to play it back and hear a bunch of static, hissing, or buzzing in the background. Whether you’re gaming, podcasting, or just hopping on Zoom calls, mic noise can make your audio sound amateur fast. The good news? You can fix it—and you don’t need to be an audio engineer to do it.
Let’s walk through exactly how to find and fix microphone noise so you can sound clean and clear every time.
Understanding Microphone Noise Types
Before you start troubleshooting, it helps to identify what kind of noise you’re dealing with:
| Noise Type | What It Sounds Like | Common Causes |
|---|---|---|
| Static | Crackling or popping | Faulty connections, electrical interference |
| Buzzing | Low, electric hum | Ground loops, power sources, EMI |
| Hissing | High-frequency “shhh” sound | Excessive gain, poor preamps |
These noises can sneak into your recordings from a bunch of different places. Could be a cheap cable, electrical interference, or even your mic picking up your PC fan. No matter the cause, they all mess with your audio quality. Static and hiss can make your voice sound distant or scratchy, while buzz is just plain distracting.
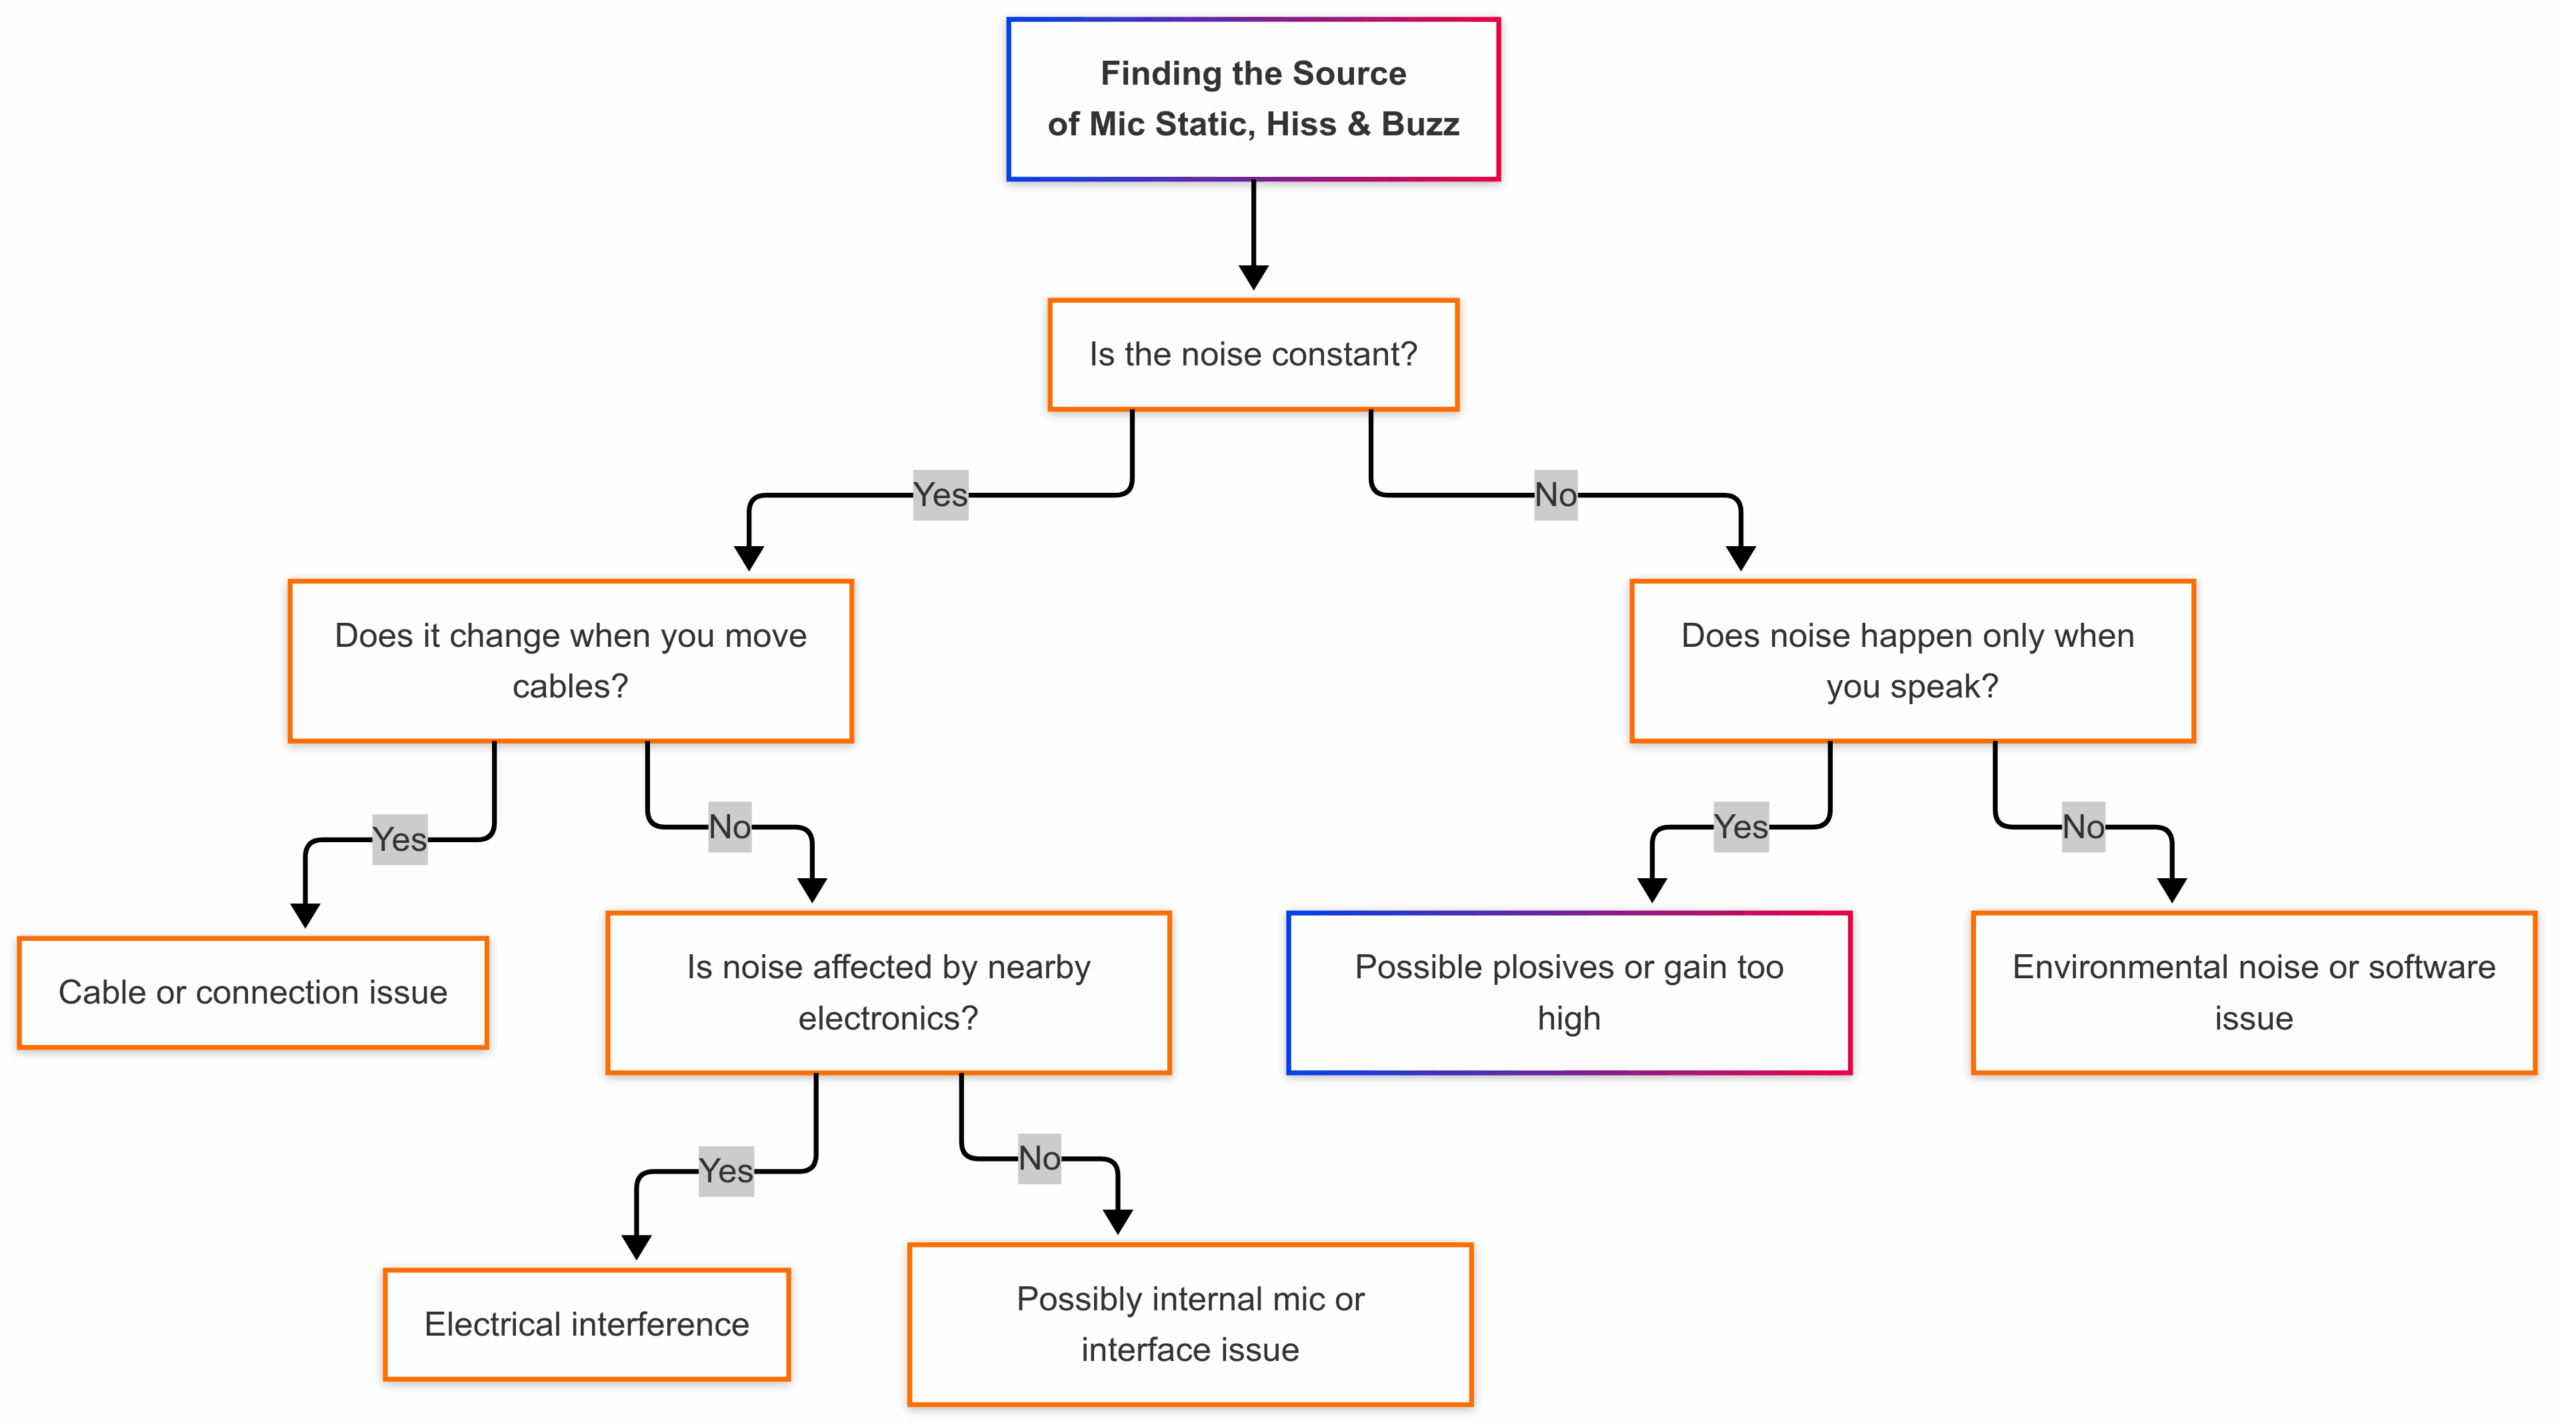
Finding the Source: Quick Diagnosis Flowchart
Start here and follow the path that matches your symptoms:
Common Noise Sources
- Electrical Interference
- Symptoms: Buzzing that changes when you touch equipment or move near monitors/routers
- Quick Test: Move your mic and cables away from other electronics and see if noise reduces
- Hardware Issues
- Symptoms: Persistent static regardless of environment
- Quick Test: Try the mic on a different computer or device
- Cable and Connection Problems
- Symptoms: Noise changes when you wiggle connectors
- Quick Test: Swap cables or try different ports
- Environmental Factors
- Symptoms: Consistent background noise or room echo
- Quick Test: Record in a different room or at night when ambient noise is lower
Hardware Solutions: Fix It At The Source
Check and Replace Cables
Budget Solution:
- Use shorter cables when possible
- Keep audio cables away from power cables
Worth the Investment:
- For XLR mics: Mogami Gold Studio or Planet Waves Custom Series ($25-40)
- For USB mics: Anker PowerLine or Amazon Basics Premium USB ($10-15)
Upgrade Your Mic or Interface
Not all budget gear is noisy, but low-quality components often introduce unwanted sound.
Recommended Budget-Friendly Options:
- USB Microphones: Blue Snowball iCE ($50), Samson Q2U ($60)
- XLR Microphones: Audio-Technica AT2020 ($100), Behringer XM8500 ($25)
- Audio Interfaces: Focusrite Scarlett Solo ($120), Behringer UMC22 ($60)
Use a Ground Loop Isolator
If you hear a persistent hum, especially when connecting to other equipment:
- Identify where the ground loop might be occurring (usually between computer and audio gear)
- Add an isolator between these connection points
Recommended Products:
- Ebtech Hum X ($70) – For power-related ground loops
- Pyle PHE400 ($15) – For audio cable ground loops
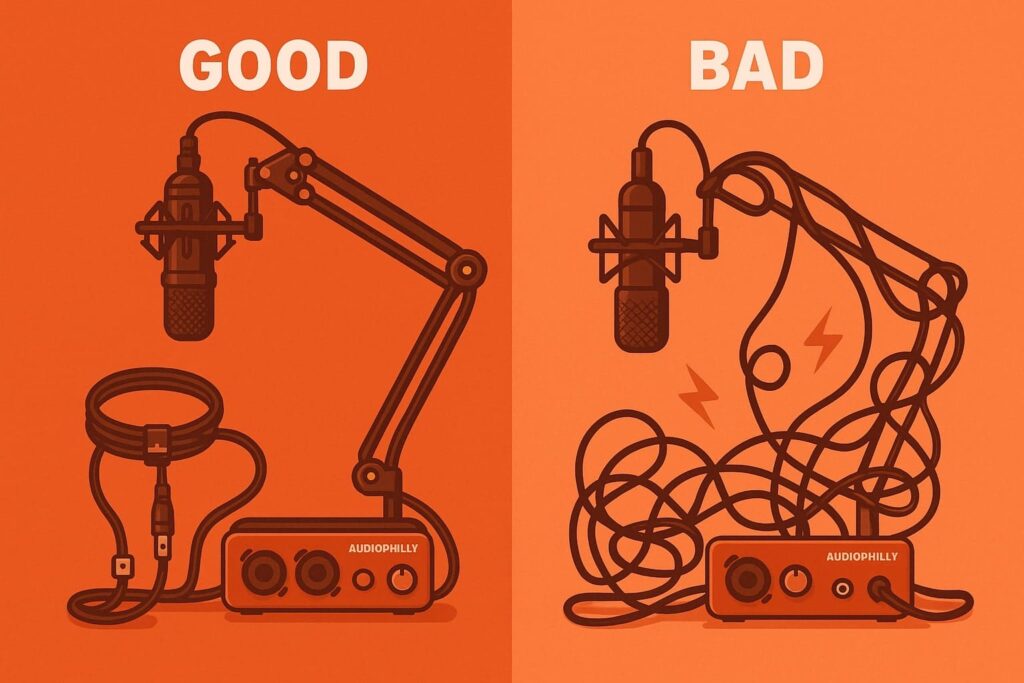
Tidy Up Your Cables
Cable Management Best Practices:
- Use velcro straps or cable clips to keep cables organized
- Create crossings at 90° angles when audio and power cables must intersect
- Maintain minimum 6-inch separation between audio and power cables
- Consider a cable management tray for your desk setup
Technical Troubleshooting: Software Solutions
Adjust Gain Levels
Perfect Gain Setting Steps:
- Start with gain at minimum
- Speak at your normal volume
- Slowly increase gain until your voice peaks between -18dB and -12dB
- Never let your audio regularly exceed -6dB

Use Noise Reduction Filters
Software-Specific Settings
OBS Studio:
- Add a “Noise Suppression” filter (right-click your mic source)
- Start with -20dB suppression and adjust as needed
- Enable RNNoise for more natural-sounding suppression
Audacity:
- Record your audio
- Select a portion with just background noise
- Go to Effect > Noise Reduction > Get Noise Profile
- Select entire track and apply Noise Reduction
- Start with 12dB reduction, 6 sensitivity, 3 smoothing
Adobe Audition:
- Capture a Noise Print (select noise-only portion)
- Apply Noise Reduction with 40% reduction to start
- Adjust until noise is gone but voice sounds natural
Check Your Interface Settings
Optimal Settings by Brand:
| Interface Brand | Recommended Sample Rate | Optimal Buffer Size |
|---|---|---|
| Focusrite | 48 kHz | 128 or 256 samples |
| PreSonus | 48 kHz | 256 samples |
| Behringer | 44.1 kHz | 128 samples |
Common Driver Issues:
- Always use ASIO drivers when available (Windows)
- Ensure Core Audio is selected (Mac)
- Update firmware regularly
AI-Powered Noise Suppression
| Software | Best For | Pros/Cons |
|---|---|---|
| NVIDIA RTX Voice | Real-time gaming/streaming | Requires NVIDIA GPU, excellent suppression |
| Krisp | Video calls | Free tier available, works with any hardware |
| PooledHouse NoiseBlocker | Podcasts | More natural sound, subscription required |
Prevention and Maintenance: Stop Noise Before It Starts
Regular Equipment Maintenance
Monthly Checklist:
- Clean mic grilles (remove and wash pop filter)
- Check all cable connections for corrosion
- Test each cable individually
- Dust audio interfaces and equipment
- Update all firmware and drivers
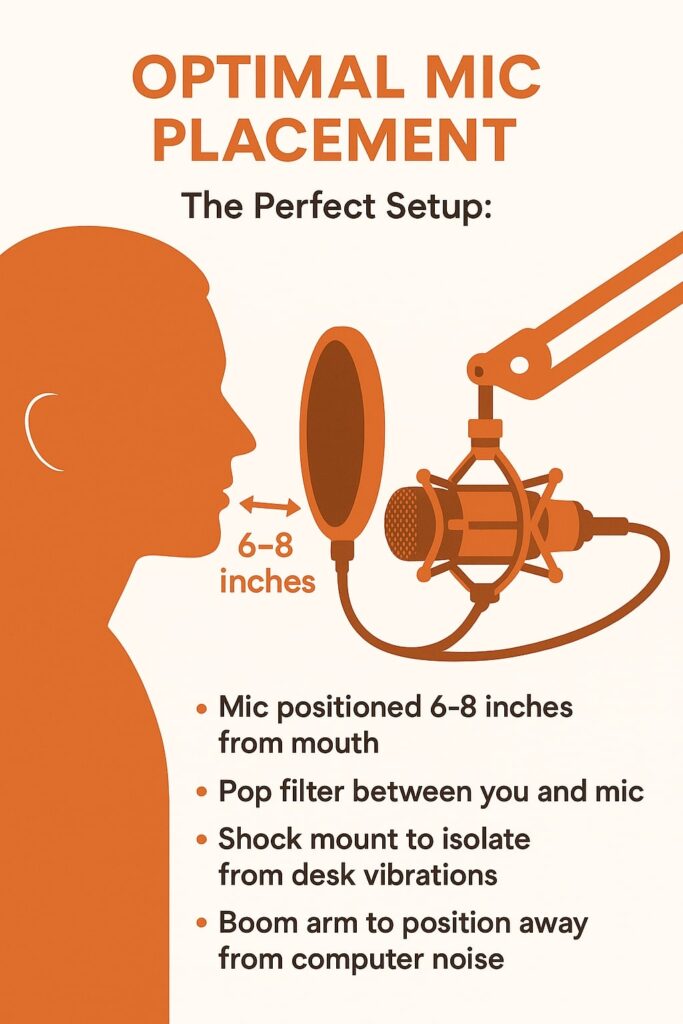
Optimal Mic Placement
The Perfect Setup:
- Mic positioned 6-8 inches from mouth
- Pop filter between you and mic
- Shock mount to isolate from desk vibrations
- Boom arm to position away from computer noise
Acoustic Treatment on a Budget
You don’t need expensive studio foam to improve your sound:
- DIY Reflection Shield: Curved cardboard wrapped in moving blankets
- Quick Sound Dampening: Hang blankets on walls behind your mic
- Desktop Solution: Small tri-fold with acoustic foam ($30-50)
Quick Reference: Troubleshooting Chart
| Problem | Potential Causes | First Solutions to Try | If That Doesn’t Work |
|---|---|---|---|
| Constant Buzz | Ground loop, power interference | Try different power outlet, add ground loop isolator | Reposition equipment away from electronics |
| Intermittent Static | Loose connection, failing cable | Check/replace cables, clean connections | Test with different interface or computer |
| High-Pitched Hiss | Gain too high, preamp noise | Reduce gain, move closer to mic | Apply software noise reduction |
| Popping Sounds | Plosives, wind | Use pop filter, speak at angle to mic | Add foam windscreen |
| Rumbling | Vibration, handling noise | Use shock mount, avoid touching desk | Add rubber isolation feet to desk |
Final Thoughts
Fixing mic static, hiss, and buzz isn’t as intimidating as it seems. Most of the time, it’s just a bad cable or a simple setting. Start with the basics, work your way through the checklist, and you’ll be surprised how good your mic can actually sound.
You don’t need a fancy studio—just a bit of knowledge and some troubleshooting time. Clean audio is 100% doable.
Got any mic noise issues that won’t go away? Drop a comment or shoot over your setup details—I’ll help you troubleshoot it!
Leave a Reply